Saturday, December 15, 2012

Candycane Love

So today I have been busy working on Christmas cookies, so I thought I would post a Christmas card that I recently made that is perfect for the season
I love how simple this card is.  I just used some decorative paper, a few brads and some jingle bells to finish it off.


Tuesday, December 11, 2012

Christmas Card Sleigh

So I've been super busy trying to get ready for Christmas
Here is one of the cards that I made.
 
I love how the berries work with the glitter 25. 
The trim works well with the color
and also a bit
of evergreen helps with the vintage feel.
I'll try to post another one within the next few days.

Monday, November 26, 2012

Paper Curl Wreath

So after finding the perfect double sided paper, I set to work creating a cute paper curl wreath!

This wreath began with a 10 or 12 inch wreath form and 6 different sheets of double sided paper.  I love the end result..... now to figure out where to hang it?


Saturday, November 24, 2012

Reindeer Box

 
I will be doing a Make n Take at our local JoAnn Fabrics on Saturday, December 8th. 
This is one of the items that you will have the option of creating. 
It is the perfect size to hold all your 4 1/4 x 5 1/2 sized cards.......
or you could go ahead and use it as a gift box.
Don't forget you need to sign up ahead of time!
Your supply list will be given to you at time of registration.

Thursday, November 22, 2012

Christmas Countdown

Happy Thanksgiving! 
Today I am grateful for many things:  My family and all the support they give me, friends, health and happiness, those that help to protect us.......the list goes on and on and on.
I actually have a few extra minutes so I figured I'd show you the calendar countdown that I made using tags!
I was recently visiting Havemans in Fremont, MI and they had a similar item in the works. 
Don't you just love it when something or someone inspires you!
This starts out with two sheets of the12x12  page protectors that holds the 4x6 photos.  All you do is sew the pockets down the center and tape the two pages together using clear tape.
 
After the construction is done, you can play around with how you want your tags to look.  I love how mine turned out a bit on the vintage side. 
 
On the back are little activities that you can do as a family for each day of the month. 


Sunday, November 18, 2012

Glitter Butterflies

It is such a beautiful day out here with the sun shining and temps above normal.  I had to share with you a card I made earlier using butterflies.
 
I apologize for the coloring in the is photo for some reason it looks a bit blue.  The butteflies I stamped in blue, green, orange and yello and went over them with the stickle glue. 
Hope these butterflies bring some sparkle into your day!
Time for me to get back to working on my Christmas project. 
Photos coming soon, I promise!

Saturday, November 17, 2012

Vintage Bird

Well its official I finally have my evenings back to craft!  I finished my last night in class on Thursday and am just working on my externship now.  Now that I have my evenings back to myself I plan on keeping up more with my blog.  To celebrate here is a card I made awhile back just never got around to posting it.
For this card I did alot of layering.  First I masked some swirls and then used some blues and green inks to color the background, removed the masks and used a brown splatter stamp.  Distressed the edges colored them with brown ink, stamped a branch in dark blue ink and attached a swallow and photo corner.  The ribbon I found clearanced out at our local Michal's store.
 
To me this card means alot, its bittersweet finishing my schooling, I became friends with some wonderful ladies and saw them five days out of the week for four hours.  I will truly miss them, the background mimics my feelings.  The metal corner protector signifies a chapter in my life, the swallow flying resembles me and the opportunities that I will encounter, and the ribbon/family metal tag represents why I went to school in the first place......My family.
 

Sunday, November 4, 2012

Unexpected Surprise

Well I decided my craft table was starting to get cluttered so I spend the day cleaning it up.  You would never believe what I found....
My salt lamp decided to reach out and touch a few extra tags!
At first I was a little upset that I had let them get so close to my lamp but after checking them out.  I really like the outcome,  I can't wait to craft with my "salted tags"  LOL


Thursday, October 25, 2012

Yarn Wig

I apologize ahead of time this is not my normal post but I just had to share with you.
Recently I tried my hand at making a wig using three different types of yarn.
The first was a boucle, the other was a single strand, and the last one was a specialty type called curly, this one is my favorite I've learned to use when making wigs.
Here are the end results.
I was going to use this for my costume this year but its too full and the coloring is a bit off, guess I will store it until next year and use it then!  Hope you enjoyed it.


Tuesday, October 23, 2012

Another Mousetrap

I totally forgot to post the picture of the altered mousetrap!
This was an ordinary mousetrap that I purchased at our local dollar store.  A bit of "sand" paint, fabric, feather, and seashells I think it turned out great.  I love how the fabric represents water and the feather looks like a bit of seaweed.  Attach a heavy magnet on the back and this will be my new refrigerator paper holder.  

Saturday, October 20, 2012

Iris Folding Dragon

Recently I tried my hand at iris folding and am enjoying the results.  My son loves dragons so I worked with a pattern but changed the coloring layout.  Good news is he loves it, bad news is I have two other boys that want one now!  LOL
Guess I will be working on a red one and blue one in the near future.

Thursday, October 18, 2012

Ghosts

With Halloween just around the corner we have been busy making some spooky cards.
Here is one that was quick and easy.  I've been using up some items that my sister purchased on sale.  To really make the ghost pop, I used a spring that was attached to foam.  To fill up all the empy black space I just added some wiggle eyes.

Monday, October 15, 2012

Heartfelt Mask

Here is another item that I sent in for Heartfelt Creations!  One of my favorite musicals is Phantom of the Opera so I pulled some inspiration from that and came up with a masquerade mask.
 The beautiful paper reminded of a worn down building.  I went to cutting around the amazing scrolling vines, took some pink vintage inspired paper from them and created some flowers.  The end result was.....
After I tore the paper into pieces and mod podged it onto the mask, it really looked like chipped porcelion.  A bit of braided trim, some diamonds, those flowers and vines that I created and a bit of tulle to help you tie the mask on and its finished.  I can just see someone wearing this with a big ball gown dancing the night away.  I love when an item looks very vintage but at the same time "artsy" as well.  Remember if you have not voted yet, you still have time.  Head over to Heartfelt Creations to vote for me Holly Thompson


Thursday, October 11, 2012

Picture Frame

I thought I would show you another item that I am sending in to Heartfelt Creations.
I found a picture frame on sale for 2.00.  Even though it was just a plain frame I  knew I could "doctor" it up.  I took the lovely paper that HFC sent me and covered the plain frame.  Some fussy cutting of the flower flowers a bit of foam tape behind them and to give it that extra dimension I stamped and cut out some more flowers (tattered blossoms stamp and die) and shaped those as well.  A few pearls and one of my favorite quotes finished it off.
Heartfelt is looking for some designers if you have not voted yet, please follow the link and vote!

Monday, October 8, 2012

File Folder Album

I just wanted to post one of the items that I am mailing in for Heartfelt Creations Design Call.  Can you believe this was a file folder?  With just a bit of ink,  amazing Heartfelt Creations paper, stamps, and dies to cut the stamps it turned into a beautiful album.
 

It is the perfect place to store some of your favorite tags!
I love how they all coordinate with each other!  Hope you like and just a reminder if you have not  voted yet stop by Heartfelt Creations Blog and vote for ya favorite designers!!

Saturday, October 6, 2012

JoAnn's Card Social

Fellow Friends, I am proud to annouce
that there will be a card social held at our local JoAnn's on
Saturday, November 3rd and I'm the designer! 
There are two times that you are able to sign up for and the class is only $10.00!
To show my appreciation to you fellow card makers
I will be doing a prize giveaway at each class! 
Space is limited so sign up soon!
See you there .
~Holly


Wednesday, October 3, 2012

Eyes!!

Today I wanted to share with you a Halloween Card that I made using some of the items my sister found on clearance last year.
 
I used the precut card and filled in the YIKES! with some glitter glue to make it sparkle.  For the pre cut eyes I gave them more dimension by using varies heights of foam tape.  This card was put together in a matter of minutes.  Quick and easy!
 
I've also been working on some more projects to submit to Heartfelt Creations.  If you  have not voted yet please follow the link and place your vote!  Just a reminder you will need to vote for five people!  Vote for me at Heartfelt Creations!

Wednesday, September 26, 2012

Heartfelt Creations- Don't forget to vote!

I was so excited to learn that I was one of the Semifinalist for the design call for Heartfelt Creations!  I love this company!  Thank you for stopping by and taking a look around.  Today I wanted to share with you some cards made using Heartfelt Creations stamps. 
If you like what you see, please vote for me!  The link is at the bottom of the post, or you can step over to their blog and Heartfelt Creations Blog  when you vote, you must vote for five people and you have the chance to enter to win a gift certificate!
This card is one of my all time favorites.
I challenged myself by using my least favorite colors orange and yellow.
The stamps are from Heartfelt Creations.
In my opinion it does have a bit of a Hawaiian feel.  When you open it up their is a surprise....
 Do you see the "surprise"?  I love how the vine is a vibrant green and the flowers "pop". I left the rectangles empty for now but the top one will be for a stamped sentiment and the bottom will be for the personal message.
This card is clean and simple. The focus is on the beautiful holly leaves from Heartfelt Creations and just for a bit of sparkle, a traditional holiday ribbon.
This card was made using one Heartfelt Creations stamp, that I just stamped over and over to get the dimension in the flowers and leaves and a bit of pearls. I love the vintage feel that this has.
Thanks again for stopping by, don't forget to vote for your favorites, just click on link below!


Tuesday, September 25, 2012

Halloween Tree

The seasons are changing and with that comes Halloween Cards!
I invited my moms over a few weekends ago to create some spooky cards.
 Here is one that I made.
 
Using my Tim Holtz Distress inks (dusty concord, mustard seed, rusty hinge, forest moss) I created the background.  The tree I cut out with my Cricut and used some black embossing powder to give it that rough look, a bit of foam tape adds dimension.  For the gate (memory box) I wanted a weathered look so I embossed it with the stampendous frantage aged silver embossing powder just in a few sections.  To balance the top with the bottom a few trick or treat stickers were added in the corners.


Monday, September 24, 2012

My Boys Create

This past weekend, the weather was a gloomy day, so I decided to let my boys create
some Halloween Cards.
We used lots of glitter glue, diecuts, chipboard, rub ons and stickers 
that my sister had given me last year, along with wiggle eyes and springs. 
 
As you can see, we had fun! 
These cards are quite heavy though, so we will be hand delivering them to a few lucky individuals.
It was a great way to spend a yucky kind of day.

Sunday, September 23, 2012

Halloween Bag

Last year for my birthday, my sister bought me a lot of shaped cards to play around with.  With the weather change, I've finally gotten in the mood to create with them.
Here is the first one.

This card is rectangle with a cute jack o lantern cutout.  I decided to add to it and turn it into a Halloween Trick or Treat bag.  I added a few eyelets in the top with some twine threaded through to make the handle, a bit of stickles in the inside to make the jack o lantern face shine and to also add a bit of decoration in the inside of the card, and every Trick or Treat bag needs some candy so I just layered all the diecut candy that she had given me with different sizes of foam tape to get all the dimension.  Hope you like


Saturday, September 22, 2012

Video from Scrapfest

Sorry I've had a busy week, but here is the video of the items I picked up from Scrapfest!


Monday, September 17, 2012

scrapfest 2012

Well, after a long 12 hour, lots of road construction trip we are pack from Scrapfest!  As promised here are a few pics.
 
Here are some lovely tags from Graphic 45!
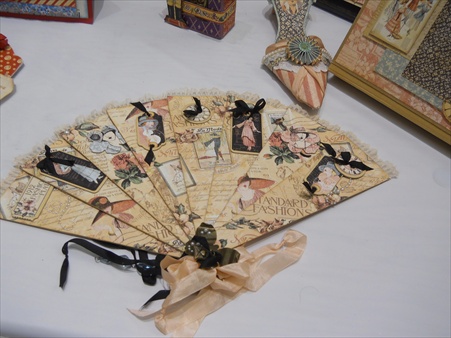
I think in the near future, I'll be trying my hand at making this lovely fan and adorable shoe.
I am not a big scrapbooker, but I love the layout of this Halloween page from Graphic 45.  The Halloween card is also one I will be attempting in the near future.
Graphic 45 again with some beautiful layouts.
 While looking through Archivers I came across these cute Halloween cards.  The one with mummy legs actually used flowersoft on the bandages, really gave it a nice touch.  I also loved the shading on the skeleton card and the spooky tree card.
We R Memory Keepers did these cards as a demo.  I love the cute cuts on the flap would work for any type of card.

Some more great samples in Archivers.  I love the swirl on the circle and the layers.
 
I love the watercolor look, the sparkle on the trees and the shadow on the deer.
Some more examples of cards that I loved!
Doesn't that dress form diecut really pop with the honeycomb paper?  Prima also had some very vintage tags that I loved.
 
I've seen tons of Youtube videos of Tim Holtz doing demos but to see him in person, and hear him talk was very cool! 
Can you believe hubby and I drove 12 hours to go to Scrapfest
and I forgot to bring both of my Tim Holtz books!!!!
Arrrghhhh 
Tim was nice enough though to sign my embossing folder and take a moment for a photo op! 


Friday, August 31, 2012

Halloween Album

As promised here is my finished Paper Bag Halloween Album!
I found this tutorial on a wonderful blog called The Paper Trail. 
To make the front I used some foam board for the covers,left over muslin that I dyed with glimmer mist sprays, cork hinges, keys, and keyhole were cut froma tim holtz die, I then inked the diecuts with black ink and used stampendous frantage aged silver, and aged gold embossing powder.  A few stampin up brads, some chain and the cover was done.
The first page.  It has a pocket for tags, and also a larger pocket (paper bag opening) by the ghost for a picture tag.
 
The second page. You can see the ribbons on the left hand side, those are the tags that you can pull out.  The flap (witch/bug) are the bottom of the bag.
Here is the Third page, lots of pumpkins and the fourth page is full of spiders with a tag peeking out as well.


The last two pages are of the Raven and a mourning umbrella.
Here is the back of the book, just like the front it has a little pocket to hold tags.
I will try to get a video up explaining in better detail how this was created!  Hope you liked it.