Sunday, September 29, 2013

Birthday Post

Today I wanted to share with you a card I made for a birthday. 
 
For this birthday card I wanted to keep it simple and not bling it up.  I used one of the decorative pieces of paper for the front and layered it with black and tan paper.  Added a bit of a chain to hold the birthday wish and anchored the sign with a bit of black paper as well.


Friday, September 13, 2013

Wedding Memories

Today my husband and I are heading out to celebrate our 16 years of marriage.  I believe that we have been able to stay committed to each other because of all the wonderful examples we have had of true love around us.  Back in October I lost my grandfather and as we were shuffling thru pics we came across a very distressed looking wedding photo of him and my grandmother, I believe it is the only one they have so I took it home, scanned it and went to work "fixing it"  Recently I decided to do a bit more with it....this is what I came up with
First off I just have to ask....Are they not the cutest looking couple?  My grandfather looks like a handsome, bad boy while my grandmother looks flawless.
I started off making this 5x7 card using dark brown cardstock and added a lavendar layer.  For the edges I took decorative scissors and trimmed the corners.  I did that as well for the 4x6 picture.  I really like the way it gives it a bit of an art deco look.  To carry on with the era, I put a bit of netting along the edges (resemble her veil) and held it down using a pearl (honor of her necklace and bracelet) and a small metal tag that says adore.  I wanted a bit more dimension so I used foam tape on the picture as well as the beautiful heartfelt creations flower.
To create the flower,
Stamp flower images one time each in vintage photo ink, line up with the flower template, tape die on and run thru cuttlebug. Color flower with lavender ink. Spritz with water and "distress" to give a crinkled aged look. Once dry build your flower. You may add a bit of brown ink to age it more. Attach pearl to the middle.
As I sign off, I just want to say without these two individuals showing me that love is not always easy, a marriage does take work at times and if you remember to care for each other you will have many years of happiness.
Thank you Grandma and Grandpa for always being there and to my wonderful husband...
Happy Anniversary, I look forward to the next 16 years!


Thursday, September 12, 2013

Sunshine Blessing

For this card I wanted to do something a bit different
 
 This is the front of the Pocket card.  I love how the flowers really pop agains the kraft background.
Here is the tag actually pulled out of the pocket card. It is simple yet elegant with the flower stamped in the corner of the card, don't ya think?
 
So what did I use to make this card, Heartfelt Creations stamps and diecuts, some kraft paper cardstock a bit of left over dark brown, cream and a lighter shade of tan cardstock, some trim a decorative brad and brown pearl, some flower fluff, left over ribbons walnut stain distress ink, and a clear star gelly pen.
For this project you will need to cut your paper to 10 1/2 x 5 paper, score at 5 &10. Attach the 5x5 onto the 1/2 seam.  If you want decorate outer flaps with embossed cardstock. Cut decorative paper 4 1/2 x 4 1/2 in 1/2 creating two triangles. Using your background cardstock 4 3/4 x 5 glue that down to the middle section. Using strong adhesive, glue the bottom of the middle and fold over one triangle flap, do the same and fold over the next flap. You have just created a pocket. Attach some trim to the edges of the flaps and a decorative pearl and of course your Heartfelt Creations flowers.
For your tag.
Mine measures 4 x 4 1/2 for the base and 3 3/4 x 4 1/4 for the cream main section. I stamped Happy Birthday and a flower using Vintage Photo ink, punched a hole to thread the ribbon thru and attached a brad to finish it. With a few outlines with the gelly pen in clear star I think it finishes it.


Wednesday, September 11, 2013

Trash to Treasure

For today's post I wanted to share with you a creation that I made using the following supplies
 
As you can see the items are Hearfelt Creations stamps along with coordinating dies, some left over corrugated cardboard from an egg crate, my favorite quote, some distress crackle paint and of course a bit of trim.
The first thing I did was cover the cardboard with paint, while that dried I stamped the flowers and inked them with my distress inks, then I used the dies to cut them out on the cuttlebug.  A bit of "aging" with the music sheet along with  positioning the quote and the trim and I was done.
Here is the finished project!
I love how the background turned out and the flowers and leaves really anchor the project.
to create more texture, I took some wired mesh ribbon cut away the the wire section and stretched it a bit creating some distress look.  I then took the wire sections and wrapped them around a pen to create some swirls.  It was anchored with a decorative brad.
Here is a view of the flowers in the lower corner.  I love how the leaves swirl around them as well adding just a bit of color.

Music, it never fails it always can get an emotion of of you.  I love this quote from Billy Joel and the instrument is near and dear to me as well as my son plays the viola currently.


Tuesday, September 3, 2013

Butterfly Message

For this card I wanted to keep it simple.
This card is done using the DCWC Mariposa paper as a layer a bit of black ribbon done up in a bow finish the front of the card.
For the inside:
 
I used a bit of the left over paper and a 3D sticker of a butterfly. 
I have yet to decide what saying I want on the card so currently its blank.
This card is entered in the following challenges.

Monday, September 2, 2013

Butterfly Blessing

I love how peaceful this card turned out.
I started out with the mariposa paper pad from dcwc.  I used the distress ink in walnut stain for the edges, the other two layers of paper are just left over scrap paper. 
The quote "A special something for a special someone" is done in walnut ink
and attached with a few brads. 
For a bit of bling, I found a few pearl sprays, along with a large mauve flower, some brown gathered ribbon and a photo corner t help to pull it all together.
 
 
For the inside of the card I attached some brown carstock for the layers,
inked the edges of the top layer with walnut stain distress ink
and using some victorian velvet distress ink I colored the butterfly tape. 
A few brads anchor it to the card base.
The picture doesn't show it but the tape, edges, and message all are shimmer due to soem glitter pen.
This card is entered in the following challenges:


Saturday, August 31, 2013

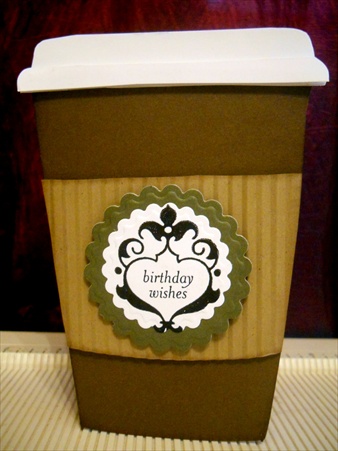
Coffee Break

For todays post I wanted to share with you a card I made for a coworker who is in love with Starbucks.

The picture does not do it justice. 
For the cup I freehanded the shape and inked the edges with Distress Ink in Walnut Stain. 
The "warmer" is just a piece of kraft paper ran thru my crimper
and inked with a bit of Distress ink in Vintage Photo. 
The green circle is a left over piece that I ran thru the cuttlebug using a spellbinder,
same thing or the white circle.
The cover for the top I freehanded it, cut out and then cut out another one for the edge and used foam tape to give it dimension.


Monday, August 26, 2013

Challenge Card

I know its been awhile since I last posted, and honestly I have no excuses just been busy with life.  BUT I'm back and ready to get into the game again!
For today's card I am entering it in the Cheery Lynn Designs challenge.
 

For this card I started off with glossy paper and alcohol inks to give it that stainglass look. 
The white frame was made with CLD Cathedral Lace dl148. 
The butterfly is also from CLD exotic butterfly dl113
and the flower in middle was cut on the cricut and rolled up. 
 I love how they all work together and really put the
attention on the beautiful scroll work of the frame.


Saturday, June 29, 2013

Quick and Simple

For today's post I'm showing you a card that I created in a matter of minutes!
To create this card I began with a light blue cardstock base, added a dark brown layer and using one of those decorative mat stacks I found this beautiful gold/butterfly one.  I am planning on stamping in the white section at a later date (waiting for just the right event).  The ribbon is just gathered and the butterfly is a punched out butterfly that I backed with sticky tape that I sprinkled with glitter to give it some sparkle.
Like I said quick and simple and a card.


Saturday, June 22, 2013

Journal Page 24... You only live once

I have finished up my journal.... well for the time being
Here is my last page until I decide to add more quotes!  LOL
This turned out to be my favorite page.
I used a variety of blues/greens and brown distress inks for the background as well as a mask in the upper corner.  The text stamp I embossed in walnut stain to make it stand out a bit.  The lock and hinges are from Tim Holtz die cuts that I stained using the distress stains and embossed them.  For the lock I chose not to emboss it but to do the rusty technique instead.  The brads I textured a bit with my hammer.  For the saying a it of twill tape, stamped it with the quote and cut the edges.
Onto the Quote...
"You only live once, but if you do it right once is enough."
For me this means to live your life with no regrets, to take changes so you can look back on your life and never have to wonder "what if"


Sunday, June 16, 2013

Journal page 23... never too late

Here is another page that I did in my journal
For this page, I took metal tape (heat tape found in our local hardware store, much cheaper than the metal sheets that are being sold out there these days) and stuck it to some cardstock then ran it thru my cuttlebug with the gear,clock, and diamond plate embossing folders.  I then used my alcohol inks to give it a bit of "rusted" look. A few gears were placed in the corners as well as a metal photo corner.  For the hand, a leftover piece that was cut on the cuttlebug I chose to bring in the blue from the other page and added a bit of vintage photo distress ink on it as well.
Onto the Quote...
"It's never to late to find out who you want to be."
For me this reminds me that it doesn't matter how old I get,
I can still be what ever it is that interest me. 
I may have a 8-5 job that helps pay the bills,
but my dream of being a well known crafter, I haven't given up on. 
SOooooo I will continue to create things on my time off
that delight me and hopefully will inspire others as well.
On that note, may my other crafty friends continue to inspire and follow their dreams because
"its never too late"


Saturday, June 15, 2013

Journal Page 22...Imagination

Here is another page of my Quote Journal
For this page I used distress inks in peeled paint, broken china and chipped sapphire for the background.  A bit of blending and some flicks of water was all that was needed.
Using the top note die from stampin up, I stamped the quote in black archival and did the same techn. using distress ink in spiced marmalade on the die.  The tickets are from Tim Holtz and I used vintage photo distress ink along the edges.  Foam tape added here and there gives it just the right dimension.
 
Onto the quote...
"Imagination is more important than knowledge.  For while Knowledge defines all we currently know and understand.  Imagination leads us to all we might yet discover and create.
 
For me this quote means to think outside of the box,
to not forget to have fun even when you are busy using your "knowledge"
 

Sunday, June 9, 2013

Journal Page 21.... In dreams

Here is another journal page that I finished up.

For this page I used distress inks in the blue/purple color families.  I picked a variety of stamps and inked them with the clear distress ink and heat set them using stampendous frantage shabby white, it has bits of gold in it.  For the stamp I inked it in archival ink (black) and stamped it onto a silver/clear fragment.  The bird, I think adds to the silver edging of the quote and carries with it some movement with left over ribbon/fibers.
For the Quote....
"In dreams we catch glimpses of life larger than our own."
For me the images help to reinforce this quote. 


Saturday, June 8, 2013

Journal Page 20...No act of kindness no matter how small is ever wasted

Here is another page in my Journal of Quotes.
To create this look, I did a variety of techniques.  I did some marble staining, a bit of blending with distress inks on the background. and dusted it with a bit of glimmer spray.  For the butterflies they are done on glossy paper withalcohol inks using a blender pen.  For the swirls I stained them and then heat embossed some vintage photo embossing powder on them, misted them with some glimmer mist in green and once the powder was dry I brushed off the crystals, created a really cool rusted green enamel look.  The swirls really do look cool but my camera just couldn't quite capture it. :(
I used some thick utee on the cage that I cut out from my cricut.
 
Now onto the quote.....
"No act of kindness no matter how small is ever wasted."
For me this means to take time to remember the little things, holding the door for the person behind you, giving a smile to a passing stranger, or letting that very anxious person pass you on the highway.
 
Yesterday I was shown kindness by many unexpecting individuals...
it made me smile and help lighten the day. 
As they say you never know what weighs on others minds
so knowing that you may beable to brighten their day in some small way is worth it.....
isn't it?


Sunday, June 2, 2013

Journal page 19....The Journey

For this journal page I wanted to keep it simple
 
I inked the background using frayed burlap and antique linen distress ink.  I then stamped various images in walnut stain to give it a collage look and I added a bit of weathered wood ink to spots along the page.  For the final touches a few cutouts "tossed" on  with a couple feathers and a faded flower that helps to pick up the color from the birds.
For the quote I stamped it on to the postcard.
 
My take on the quote.....
When you encounter a journey you may not realize all that happens, the discovery process,
the learning part, you taking the time to explore, and lastly the inspiration. 
For me "The Journey" can be soo many different things...
an adventure to an area you have never been, a new job, or even meeting someone. 
The most important part of "the Journey" is to take time to notice the whole process.

Saturday, June 1, 2013

Journal Page 18~ Learn from yesterday..

For my next journal page I went all out vintage.
 
I wanted to create a page that resembled old wallpaper, but with a bit of color.  Using this Damask stamp I inked it in chipped sapphire and did the background in frayed burlap ink then clear embossed the whole page.  It adds a lot of texture to the page.  For the vintage part, I added some crochet trim, a photo corner, old safety pin, a metal flower that has a silk rose inside and a bit of frayed canvas.
Here is a close up of the canvas with the quote on it. 
Now onto the quote:
"learn form yesterday, live for today, hope for tomorrow."
Simple words that are at times quite hard to follow....I'm hoping with this reminder I can live by this.
 

Saturday, May 18, 2013

Journal Page 17....Beauty Seen

For Todays journal page I wanted to create something bright and colorful
 
To create this bright background I took tattered angels sprays, sprayed it on my paper and wiped it with a paper towel, giving it more of a colorwash look. 
I also added in some of my homemade shimmer mists in a variety of colors
and finished it off with added a bit of Tim Holtz distress inks for added depth. 
For the butterfly I used a tattered angels mask that I inked in embossing ink,
sprinkled it with a shimmer embossing powder and heat set. 
I also applied a bit of stickles onto it for just a "ghost" of a sparkle.
 
Now onto the quote:
"Beauty seen is never lost"
Translation for me: When you see something beautiful it is bright and vivid, but as time goes on the image may fade away (the fading ink, the words a bit faded in areas)
BUT
the image or memory never truly goes away (the ghost of the butterfly) its always there.

Saturday, May 11, 2013

Journal Page 16- Art Washes away

This weekend we are celebrating Mother's Day, with that comes Mother's Day projects. 
My two youngest sons both answered questions about me. 
Needless to say my love of crafting came up on both of them!
I had to laugh as one commented on the best gift he could give me
would be buying me the last craft item that I need........ silly boy he has yet to realize that they are always creating something new that us crafters need!  LOL
So the journal page is a reflection of what my "crafting" does for me........
For this page I did alot of layering with inks.  I also swiped a bit of white paint on it and added a bit of silver mica flakes.  For the tag I grunged it up a bit and also the ribbon. 
 
The quote "Art washes away from the soul the dust of everyday life.  ~Picasso
For me that translates to wiping away the stresses of everyday life.  We all have them rather it be work, family, or finances. If left unattended they can clutter the soul. Everyone has their "stress buster"  for me it is creating art. 
The "messy" background represents the stress,
the white paint represents the wind or act of "dusting"
and the mica flakes are bits of the stress flying away.
So for this Mother's Day I sent to you a happy well deserved break from all your stresses.  May you enjoy your day.


Sunday, May 5, 2013

Alcohol Inks as Watercolor

So today I worked on creating my alcohol ink pallate. 
I finally have the whole set, needless to say this is only one section of them....
Poor hubby is gonna have to hang the other wire tray so I can get the rest of them up!
Here is a video of how I went about it.
 
 
Thanks for watching the video, as promised here is the finished project.


Saturday, April 27, 2013

Love of Chocolate

Today I decided to show you a card that I recently made

This card is simple yet cute.  I love how the chocolate, pink and tan play off of each other.